Wednesday, August 14, 2013

Vegan Waffles

I bought a new waffle iron. And oh, was it worth every penny. I previously had a ten dollar waffle maker that I bought on a whim at Target, but while browsing through Williams-Sonoma the other day, I caved in and bought a new one. To be fair, it was on sale, and my other waffle maker turned out soggy waffles. No one likes soggy waffles.

And yes, I have an obsession with breakfast foods. It's my favorite. For realsies.


Vegan Waffles
1 1/2 cups whole wheat flour
1 cup unbleached all purpose flour
1/4 cup brown sugar
2 teaspoons baking powder
1 teaspoon baking soda
3/4 teaspoon salt

2 1/4 cups unsweetened almond milk
1/4 cup vegetable oil


Mix all dry ingredients together until well blended. Then add wet ingredients and stir gently until batter is smooth. Use your favorite waffle iron's directions to cook. I added about a half cup of batter for each waffle. Mine made 7 waffles, but the yield will vary depending on the size of your waffle iron.

Live long and nom on, friends.


Wednesday, February 20, 2013

Meatloaf, the Underrated


Before you completely write off this recipe...forget everything you think about meatloaf. It's not flavorless, it doesn't have to be dry, and in fact it's a great way to feed yourself for a week for under $10.

Plus, meatloaf sandwiches are pretty much the greatest leftover food ever.


What You Will Need
1 lb ground beef
1 egg
2 small onions, chopped (or 1 large)
1 cup milk
1 cup oatmeal or bread crumbs (finely ground)
Seasonings (approximated measurements)
2 teaspoon minced garlic
1 tablespoon dried oregano
1 tablespoon salt 
1 teaspoon dried basil
1 teaspoon ground pepper
a dash of cayenne pepper

What To Do (Photo Instructions Below)
1. Preheat oven to 350 degrees F.
2. Grind oatmeal in a blender or measure out breadcrumbs and put in large bowl. Add seasonings to the oatmeal.
3. Chop the onions and add to oatmeal alongside the egg, milk, and ground beef.
4. Mix well.
5. Pour onto baking sheet lined with aluminum foil sprayed with cooking spray, shape into a loaf and bake at 350 degrees for an hour or longer until golden brown and done in the center.

Grind Oatmeal in a blender to get a fine consistency.
Add seasonings to oatmeal. Measurements can be approximate.
Chop onions and add to bowl.
Add egg to mix. If you're awesome, you can do it one-handed.

Add the meat. That's important for meatloaf.
Stir it all up!

Shape the loaf on a pan that has a layer of greased aluminum foil (easy cleanup).
Bake at 350F for at least an hour, or until the crust is golden brown. Hope your housemates don't walk in on you taking pictures of the oven.

Let rest for 15 minutes, then slice and serve. YUM!

Notes:

1. Don't use the leanest ground meat you can find. I know you want to be healthy, but in this case, use a fattier blend (I used 85% lean ground beef from Trader Joe's). If you want to substitute ground turkey...seriously think about adding some fat. Like bacon (I know, I'm really twisting your arm here).

2. If you do want to ramp up the health factor, mix in veggies to the loaf. Like green or red bell peppers. It's yummy and stretches the meals even farther.

3. Make sure you have bread on hand for leftover meatloaf sandwiches.

4. Sure, you can buy seasoned bread crumbs. But if you already have oatmeal/plain bread crumbs and seasonings, just make your own.

Ok...so I made meatloaf so I could have a sandwich. I don't regret it.
5. Free formed loaves are great for a few different reason. First, you don't have to buy a glass loaf pan and most people have a cookie sheet. Second, the loaf gets more crust, which is arguably the best part. Third, the loaf can be shaped to make optimal meatloaf sandwiches.

6. Lastly, you can glaze with ketchup/brown sugar if you want...but with all your favorite seasonings added in, I don't find it completely necessary. But if you'd prefer it glazed, just mix 1/3 cup ketchup with 2 tablespoons both of yellow mustard and brown sugar and pour it on top of the loaf before baking.


News, News, and News

 It's been a long time since I last posted, but I have some big news! Four big things, really:

1. ExpendablePolo's food blog is back. Yup. It's been a long hiatus, but it's back. Expect posts weekly now!

2. The blog has a new direction. As I am no longer full time vegetarian, part time vegan, the blog needs to reflect my new omnivorous tastes. And it shall.

3. This blog will be emailed to students at the fabulous Fairfield University who want to join my mailing list.

4. I got a new camera, so expect higher quality photos.

So get ready for the revamped blog! GO STAGS!

Tuesday, August 7, 2012

Basil Pesto Green Pizza

So remember that pesto I made the other day? We had some leftovers, so I decided to use it as an alternative to tomato sauce on a homemade veggie pizza.


Well, we planned on making it vegan. But then we started thinking about how good some fresh mozzarella would be on it, all melty and hot out of the oven. I caved and bought a ball of the delicious cheese from Stew Leonard's. And oh, was it worth it. Still, this pizza is easily made vegan by leaving out the cheese!

To the right,  after I let them brown a bit with a touch of olive oil. You want to make sure the onions are cooked as much as you really want them to be, because the pizza won't be in the oven long enough to fully cook the onions. I like onions on my pizza soft and slightly caramelized. If you want to fully caramelize the onions, keep browning them past thestage you see in the photo until the onions are golden brown. 


Above, you can see all the ingredients I added to the pizza before cooking. After rolling out the dough on a cookie sheet (make sure you grease!!!!) I spread a layer of basil pesto, broccoli florets, some chopped garlic, the browned onions, and some sliced fresh mozzarella. I also like to add some fresh cracked pepper on top of the cheese, it tastes good and looks pretty.


 Then I popped this sucker into the oven and baked for about 15 minutes according to the directions on the pizza dough I used. When it was done, we let it cool for a few minutes and sprinkled it with fresh basil chiffonade (basically, basil strips). Easy as, well, pizza pie.


 Basil Pesto Green Pizza (Serves 8)
1/2 recipe Vegan Basil Pesto
1 Pizza dough
1 onion, cut in half and sliced
2 tablespoons olive oil
2 cloves garlic, chopped
1 head broccoli
1 ball fresh mozzarella
pepper, to taste
fresh basil leaves

In a medium sized pan, heat olive oil and cook onions until lightly browned. Cool. Cut small pieces of broccoli from head and set aside. Slice fresh mozzarella and cut into halves.

Preheat oven and prepare cookie sheet (or pizza stone). Prepare the pizza dough for topping as per manufacturer's directions. Spread pesto in a thin layer evenly on the prepared pizza dough. Then top with garlic, onions, and small pieces of broccoli. Top with slices of mozzarella and sprinkle with fresh cracked pepper.

Bake according to pizza dough directions, being sure to add a few minutes if necessary to ensure crust cooks through at the center. When done, remove from oven and let cool for a few minutes. Meanwhile, stack 6-8 large basil leaves on top of each other and roll them up. Slice through basil roll to create chiffonade cut basil. Sprinkle basil evenly across pizza before serving.

Nutrition Estimates (1 slice)
Calories: 384 Carbs: 32g Fat: 22g Protein: 17g

Nutrition Estimates without Mozzarella (1 slice)
Calories: 224 Carbs: 32g Fat: 10g Protein: 7g


Sunday, August 5, 2012

Vegan Basil Pesto Sauce


Summertime has three distinct meanings for me. First, it means that I have a three month break from reading dull textbooks, writing dull papers, and sleeping on average less than 5 hours a night. Second, it means scorching heat, painful sunburns, and distressing humidity. Aside from these extreme exaggerations,  summer means fresh vegetables and aromatic herbs. And this year, I'm growing my own basil plant.


Okay, so my basil plant isn't very big yet, and I can't really cook anything of substance with it. But it is growing!!! And I'll buy huge basil bunches from the grocery store so my little plant can aspire to one day become something. Like pesto.


I still remember the first time I tried pesto. I was hooked instantly. My mom had gone out to dinner for work, but when she got home, she woke me up and told me to try some of the pasta she had brought home. It was like nothing I'd ever tasted: peppery and garlicky, but so fresh tasting. It was a lot of familiar flavors presented in a new way. It was just a pesto sauce coating tortellini, but it was delicious.


 And now, I make my own pesto. An even fresher pesto, sans cheese. A lighter pesto too, with less olive oil but still tons of great basil flavor. You could even make this with cilantro or mint, if you prefer. If you're really daring, you could even do a combination of herbs. Basil mint pesto would be an extremely refreshing sauce for a hot summer's day. Also, feel free to play around with the nuts used. I would venture to guess that a mint walnut pesto (without garlic) would make a delicious topping for desserts.


Be strategic when choosing a pasta for your pesto sauce, if that's the route you're taking. I like to choose a pasta that has ample spaces to fill with sauce. Penne, tortellini, and rotini are all great choices in my book. But then again, I have been known to even mix in a spoonful of pesto with a bowl of rice.


Vegan Basil Pesto Sauce (Serves 4)
2 cups loosely packed basil leaves
1/2 cup toasted pine nuts
2 cloves fresh garlic
1/4 cup olive oil
1 tablespoon lemon juice
salt, to taste

Combine basil, pine nuts, garlic, and lemon juice in a blender of food processor. Begin to pulse, adding in olive oil to help the mixture come together. Continue to process until the sauce comes together. It should be a smooth paste. Cover and refrigerate for about an hour to let flavors blend.

Nutrition Estimates (one serving):
Calories: 164 Carbs: 3g Fat: 17g Protein: 3g

Monday, June 25, 2012

Vegan Lemon Curd

The word "curd" is a little off-putting. I always end up thinking of cottage cheese or the great state of Wisconsin. But in reality, lemon curd is a delicious and versatile treat. Surprisingly creamy and delightfully tart, you can spread lemon curd on just about anything: ice cream, toast, scones, or you could even use it to fill a cupcake. Sure, you could buy a jar, or you could make your own in less than 15 minutes.


The great thing about curd recipes is that you can tweak it to however you'd like it to be. Want it sweeter? Add more sugar. Rather have lime or orange curd? Go right ahead. I'm not the kitchen police. Mix it up and have a little fun.

Further, a citrus curd makes a great present. Just wrap them up in little jars with a cute little tag describing the contents and you could give this away as a birthday or even Christmas present. I even think this would make a really great party favor!

This lemon curd recipe is adapted from Kim's recipe at C'est La Vegan . I prefer more lemon juice and more lemon zest for a more tart, lemony impact. Also, many recipes call for turmeric just for the color. I didn't want to muddle the flavor at all, so I left that out and still got a beautiful creamy yellow hue. While the curd smells like an ambrosial blend of coconut and lemon (I wish I could turn it into a candle, in fact), it has a great tangy lemon punch with a twinge of creamy coconut on the finish. Delicious.

Lemon Curd 
3/4 cup light coconut milk
3/4 cup lemon juice (about 3 large lemons)
4 tablespoons cornstarch
1/2 cup granulated sugar
1 teaspoon vanilla extract
lemon zest (I used zest from 3 lemons)

Zest lemons, then juice. Add lemon juice, coconut milk, cornstarch, and sugar to saucepan. Whisk until completely combined. Cook/whisk on high heat until mixture is hot, but not boiling. Reduce heat to medium, and continue to whisk until mixture thickens. Remove from heat and add vanilla and lemon zest. Remove from pan immediately and allow to cool before covering and refrigerating. 

Wednesday, June 20, 2012

Butternut Squash Pasta Sauce

I'll admit that I've spent a lot of time in the kitchen this summer. And as much as I'd like to pretend I've been slaving over a hot stove and whisking sauces until my arms are ready to fall off, it hasn't been like that. I've enjoyed every single minute of food preparation, and I've challenged myself to make new dishes and try new things.


Well, this is one of those new things I've tried. I'd seen recipes for this popping up on FoodGawker every now and again, some comparing it to my beloved macaroni and cheese. I didn't believe that a pasta with Butternut Squash Sauce would be such an amazing comfort food, but it truly did parallel my favorite cheesy pasta dishes and definitely won a place in my go-to recipe box.

This recipe is a simplified version of other recipes I found online. Mostly, I didn't have celery or tomato paste on hand and really didn't feel like going to the grocery store. But as a result, this pasta sauce is full of butternut flavor and because of the combination with thyme, tastes like fall. Even better, it's incredibly simple.


 First, I boiled a 20 oz package of butternut squash until it was soft. Usually I don't mind deconstructing fresh vegetables, but this is actually a bit out of season right now, so I could only find it in chunks. But, it was a great time-saver!


Then after removing the squash from the pot and draining the water, I heated some olive oil and added a chopped onion and two cloves of garlic. I let the onions turn translucent, and then added the vegetable stock. Again, cook the onion until very soft.


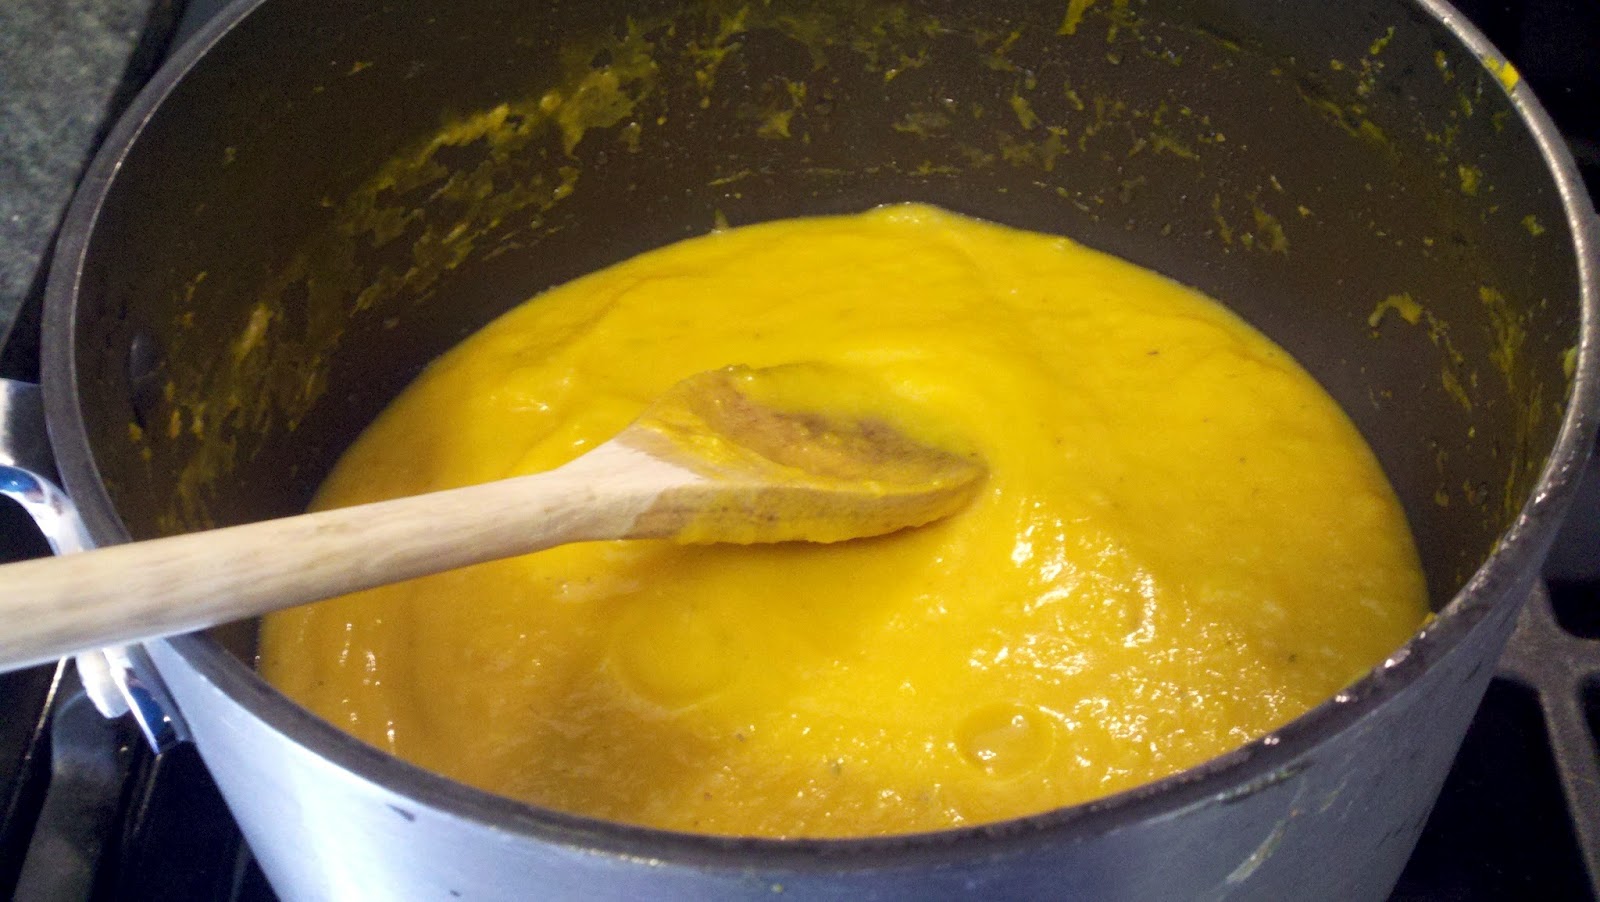
 After adding the squash back into the pot and letting it cook for a few more minutes, I took the pot off the heat and let it cool for about 10 minutes. Then, I blended the squash and onions until smooth (I had to do this in batches because my blender is pretty small). Then, I poured the squash puree back into the pot.

To season, I added a teaspoon of dried thyme (you could use a tablespoon of fresh thyme if you have it on hand) and a bit of salt and pepper to taste. I also added some plain unsweetened almond milk to make it creamy. I set the sauce aside while the pasta cooked and threw it back on the stove for just a minute to reheat before serving (I like my pasta sauce steaming hot).


 A little bit of extra cracked pepper on top....and oh, I suppose you might like a close-up.


Butternut Squash Pasta Sauce (Serves 4)
20 oz butternut squash pieces
1 large onion, roughly chopped
2 cloves garlic, chopped
2 tablespoons olive oil
1 cup low sodium vegetable stock
1/2 cup unsweetened plain almond milk (or other plain milk)
1 teaspoon dried thyme
Salt and pepper, to taste

Boil squash in medium pot on stove until soft. Drain and set aside. In the same pot, heat olive oil and add onion and garlic. Cook on medium heat until onions are translucent. Add 1/2 cup of the vegetable stock and let simmer until onions are soft. Add squash pieces back in and let cook until all vegetables are soft. Remove from heat and let mixture cool about 10 minutes. Blend mixture until smooth, then put back in the pot. Add remaining vegetable stock, almond milk, and thyme. Add salt and pepper to taste. Heat through and serve.

Nutrition Estimates (for one serving of sauce)
Calories: 142 Carbs: 20g Fat: 7g Protein: 4g