Sunday, October 30, 2011

Daring Baker's - October 2011

The Daring Baker’s October 2011 challenge was Povitica, hosted by Jenni of The Gingered Whisk. Povitica is a traditional Eastern European Dessert Bread that is as lovely to look at as it is to eat!

I didn't have coffee to do a traditional topping, so I used melted butter and some extra granulated sugar. Still pretty!

Lucky for me, I had a lovely three day weekend over which I was able to do my challenge. Unfortunately, I was not able to make the traditional Povitica, as it contains walnuts. As delicious as I'm sure it is, my residence hall has a strict no peanut/tree nut in common areas. However, I had just bought a bag of apples that I decided to turn into the filling for my Povitica. 

 I just want to say, even though a few steps were a little tricky, I really enjoyed making this challenge. Bread making is one of my favorite ways to spend an afternoon. And this bread was great to have around for breakfast before class, and I even shared with a few of the other students who live on my floor. For a week and a half people kept asking if I had any of that "apple bread" left.

The starter.


This bread was fantastic for a quick breakfast before class. I definitely will make Povitica again, and hopefully next time, I'll be home so I can make the walnut filling!

Tuesday, September 27, 2011

The Croissant

The Daring Bakers go retro this month! Thanks to one of our very talented non-blogging members, Sarah, the Daring Bakers were challenged to make Croissants using a recipe from the Queen of French Cooking, none other than Julia Child!


I was actually really excited for this month's challenge recipe, as breads are one of my favorite things to make. There's something quite magnificent about the yeasty smell of bread dough that is proofing. This was also my first challenge back on campus, so I was also a little nervous about how the community kitchen in my building would work out.

While I was slightly daunted by the 12 hour minimum time needed for the recipe, I set aside my weekend to work on my dough. At 8pm on a Friday night (I was on RA duty, also), I mixed up the dough and let it sit for its first rise. I rolled it out that night (luckily before any incidents would occur) and popped it in the fridge for an overnight rise. 
Waiting for the dough to rise...STALEMATE!

Rectangle before 2nd rise

Then it was time to take out some anger on an unsuspecting stick of butter.


Butter!
The butter then was spread out on the dough, and then the first two turns were made. This consisted of folding the dough over the butter and then rolling it out again. 


First turn.

Finished dough packages.

Two turns, and then a rest for the next few hours, and the above packages of dough were the finished problems. It's probably worth noting that I made a double batch knowing that friends and others who know I bake would be wanting to try the finished products. I was really excited at this point, because a mere two more hours and I'd finally get to roll out the croissants! I actually found this part of the process really easy and quite fun. However, since I had to work fast, I couldn't take pictures, really. 


Finished dough, ready to be cut and rolled into croissants.

Rolled and ready to proof!
So, now the croissants were ready to proof. And I sat around for yet another hour waiting for the baking process to finally start.


The proof is in the poof!

Finally! The moment of excitement! I put them in the oven a mere 22 hours after the whole process began. And finally, the luscious scent of buttery bread baking filled the kitchen lounge, taunting the residents that were also in the kitchen cooking dinner. A short 20 minutes later, this is what was pulled out of the oven: 


Beautiful. Golden Brown. Buttery. Nom. I took more pictures (some with the help of my friend Erik) of the crumb inside.

Nom!

Not a perfect crumb for croissants, but still yummy.

A croissant crumb is supposed to be extremely light and fluffy, full of air holes. I think if I'd have let mine proof longer, I could have achieved an airier crumb. However, they still tasted great and were plenty flaky, so I'd call it a job well done.


Overall, I really can't wait for the next challenge! While I keep hoping it will be a bread challenge again, I don't think it will be. My next blog post should be documenting making cinnamon rolls, as I hope to make some soon!

Saturday, August 27, 2011

Daring Bakers August Challenge

The August 2011 Daring Bakers’ Challenge was hosted by Lisa of Parsley, Sage, Desserts and Line Drive and Mandy of What the Fruitcake?!. These two sugar mavens challenged us to make sinfully delicious candies! This was a special challenge for the Daring Bakers because the good folks at http://www.chocoley.com offered an amazing prize for the winner of the most creative and delicious candy!

And so for my very first Daring Bakers Challenge, my heart sunk when I saw that we would be working with chocolate. In August. The last time I attempted to make a truffle in the middle of summer, I ended up with a bowl of dipping chocolate swirled with melted ganache and some very clumpy mounds of chocolate chaos. But I suppose thereinlies the "challenge" aspect.


Since the definition of insanity is doing the same thing over and over and expecting different outcomes, I decided to take a different approach to my truffles. I decided to do a molded/filled truffle instead of dipping, in hopes that it would work out better. And though it does pique my curiosity, I decided to not even attempt to temper the chocolate. I don't really have the counterspace/patience/nerves of steel it takes to do that. Sorry, Chocoley, I guess I won't be entering your competition after all.

After a quick trip to Trader Joe's to pick up what was an obscene amount of chocolate, I decided on a milk chocolate orange truffle. It just sounded yummy. I used a half a cup of almost boiling heavy cream with a splash of orange flavoring added to about a half a pound of chocolate for the ganache, and then spooned into milk chocolate molded cups. A few hours in the fridge and they were ready to come out of the mold. Well, I was ready for them to come out of the mold. But they were more resistant.


Overall, they turned out well. But, then again, anytime you add cream and chocolate together, you get the food equivalent of a liger. Pure magic.

But the challenge doesn't end after I attempt the troubling truffle. I still have to make another candy, chocolate or non-chocolate, to fulfill the challenge guidelines. While flipping through my candy cookbooks, I stumbled upon the perfect recipe to fulfill my quest: the homemade marshmallow.

Boiling the sugar, corn syrup, and water.

Sure, store-bought marshmallows are great. But the handful of times I've had homemade marshmallows is making me crave the fluffy, gooey, vanilla mess right now. If any of my readers are from Kalispell, Montana, you may very well know the bliss of having a latte from Colter Coffee topped with one of their homemade marshmallows. The way the marshmallow melts into a sweet and creamy pool on top of the lucious latte still gives me the chills. It's definitely one of the things I miss most about my hometown.
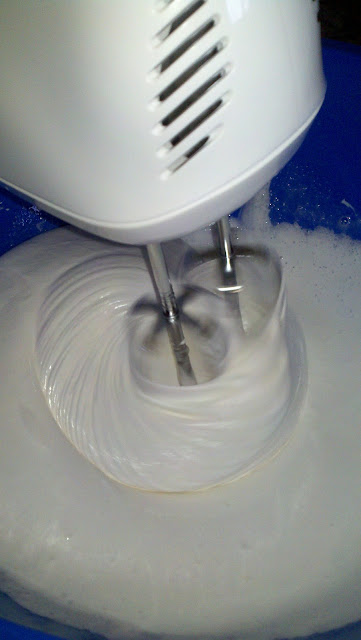
Such pretty fluff!
So of course, I don’t find the time until the challenge is actually due. August 27, the day before a hurricane, I’m back on campus, and I have to make marshmallows. So, I pack everything I own into a bag and hike down two floors to the kitchen lounge and set up camp. I decided to use Alton Brown's recipe, and I was pretty surprised it only took about an hour from start to finish.


They still need to dry and be cut, but if the marshmallow fluff I licked off the spoon is any indication of how they will turn out....YUM! I may not share this batch, but I will definitely make more very soon.
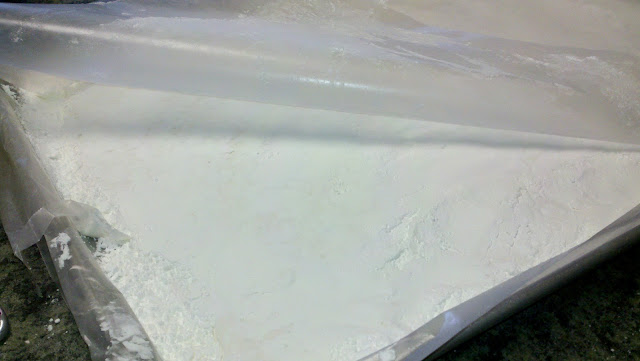
Somewhere under that powdered sugar are marshmallows.
Wish me luck with the hurricane, and at least we've got marshmallows to snack on!